
Benewake LiDAR GUI Viewer User Manual
Benewake LiDAR GUI Viewer User Manual, including the parameters, figures and instructions in the original document.
Ben e w a k e Li D A R Vi ew er
GU I Us er M an u a l
1 Bri e f Int r o du c t i o n
1.1 Obj e c t i v e
The pur p o s e of thi s art ic l e is to ex p la in the ba s ic fun c ti o ns , op e r a ti o n me th o d s and pr e c a ut io n s of Ben ewa k e LiD A R Vi ewe r GU I (her e ina f te r re fe rr e d to as BLV ).
1.2 S yst e m In t ro d u ct i o n
BLV is a GU I so f tw a r e use d by AD 2 LiD A R , whi c h is ma in ly use d fo r rea l- tim e disp l a y , re c o r d in g and pl a yb a c k of po i nt cl o ud da t a . BLV is co m p ile d on the Wind o ws 10 pla t fo r m , and it is re c o m me nd e d to ins ta l l and use it on Wind o ws 10 and ab o v e sy st em s .
1.3 Ter m s an d Ab bre v i at i o n s
| Te r m s an d ab b re v ia ti o ns |
Me a ni ng |
|---|---|
| IP | The IP ad d r e ss of the net wo r k pro to c o l use d by the LiD A R co m mu nic a t io n |
| MD O P | Pr im a r y da ta tr a ns fer po r t |
| DC S P | De v ic e co nt r o l co m ma n d tr a ns mi ss io n po r t |
| DS O P | The po r t whe r e the dev ic e st a tu s info r ma t io n is tr a ns m it te d |
| *. p c d | A file fo r m a t in whi c h the GU I sa v es po int clo ud da ta , whic h ca n be dir ec t ly rea d an d pla y ed ba c k by the GU I |
| *. c sv | The GU I sa v es a fil e wit h thi s fo r m a t fo r po int clo ud da ta , whi c h ca n be vi ew ed di re c t ly in Ex c el or Wo r d |
| *. p c a p | A file fo r m a t in whi c h the GU I sa v es po int clo ud da ta , whic h ca n be dir ec t ly rea d an d pla y ed ba c k by the GU I . |
Ta b le . 1: Ter m s and ab b r ev ia t io ns
1.4 Pre c au t i o n s be fo re use
1. Bef o r e usi ng the LiD A R , yo u need to cha ng e the IP ad d r ess of yo ur co m p ut er .
Ne tw o r k an d Int er n et → Et he rn et → Ch a ng e ad a p t er op t io n s → Pr o p e r ti es → In t er ne t Pr o to c o l ve r si o n 4 (TC P/ IPv 4 ) , set the ho s t IP ad d r ess to rem a i n on the sa m e ne t wo r k seg me nt as the LiD A R IP ad d re ss (i. e. , seg me nt 0) , sub ne t ma s k 255 . 255 . 255 . 0 , and ho s t IP ad d r e ss us ed in thi s ins tr uc ti o n ma n ua l is 19 2 . 1 6 8 . 0 . 10 (th e la st byt e is di ffe r ent fr o m the IP ad d r ess of the co nne c t ed dev ic e ) .
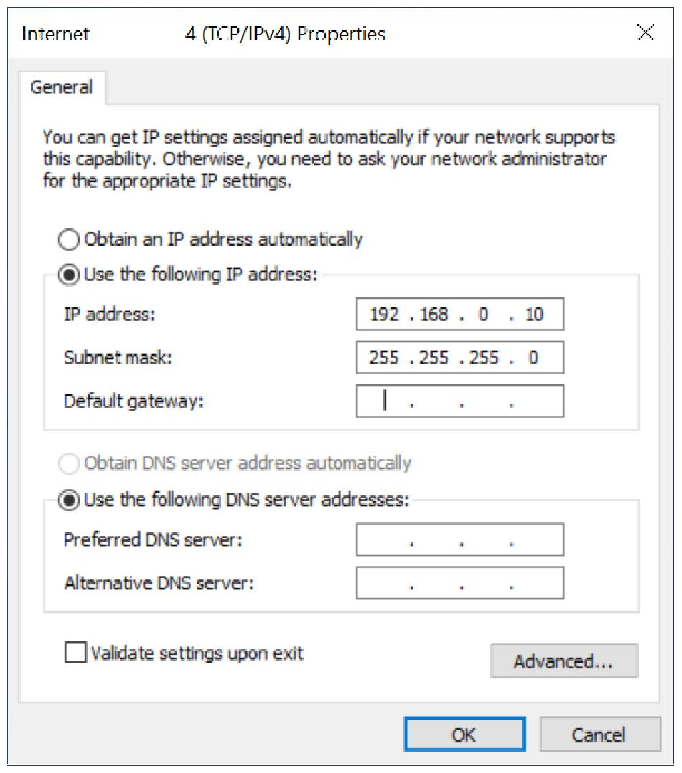
Figu re . 1 : Co nfi gur i ng IP ad d r ess 1. Ma k e sur e tha t yo ur co m p u te r 's fir ew a ll is tur ne d off (t his is op ti o na l : if yo u ca n't co nne c t pro p er ly , tr y thi s st ep aga in ) . Co n tr o l Pa nel → Sys t em an d Sec u ri ty → Wind o ws De fen d er → Tur n on /o f f Wind o ws De fe nd er Fir e wa ll .
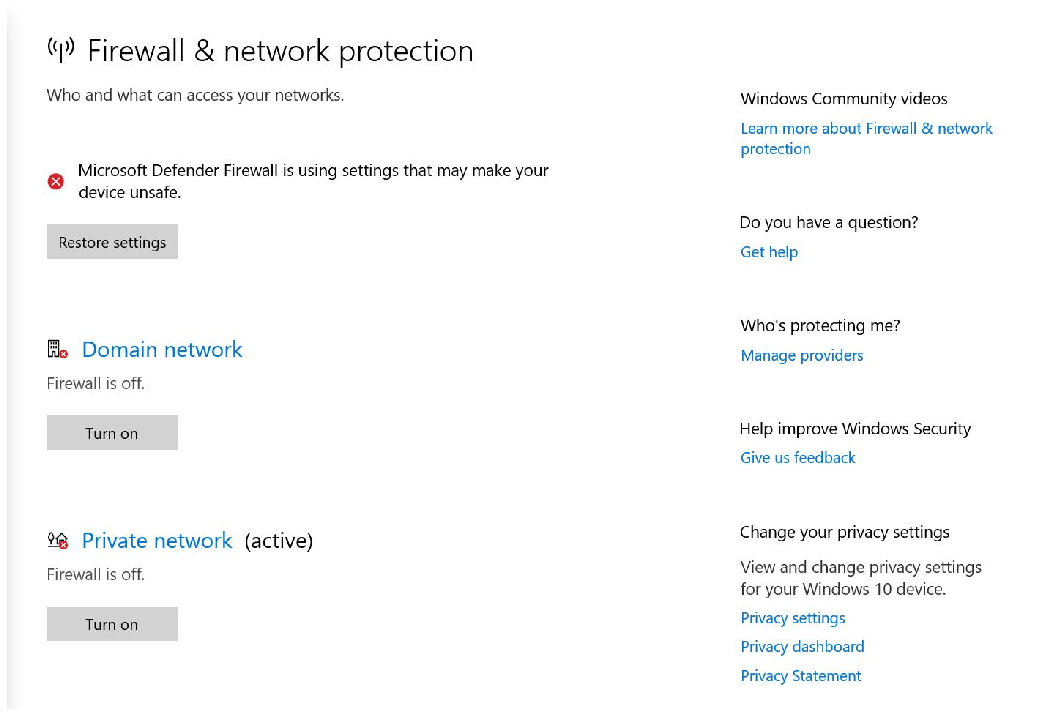
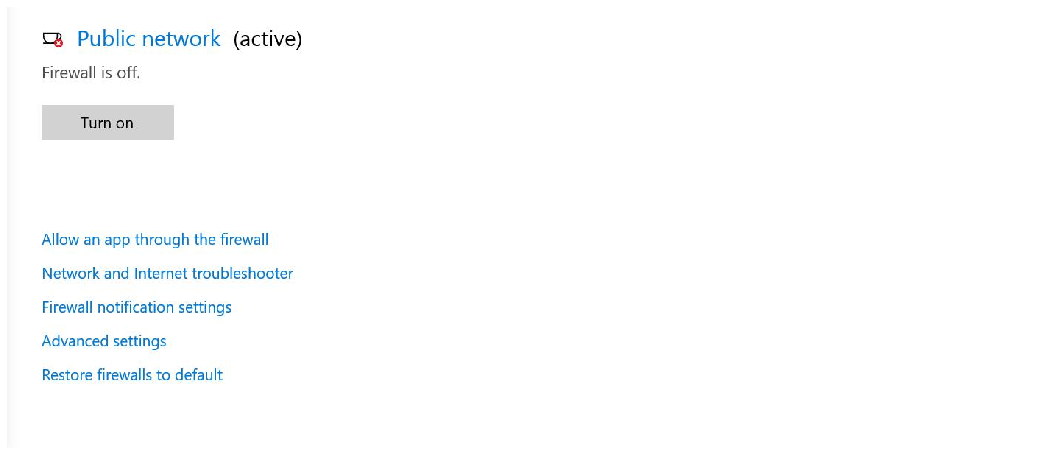
Figu re . 2: Tur ni ng off fir ew a ll
2 F il e St ru c t u r e
BLV fil e st ru c t ur e (p a r t of the file ) as sho wn in the fig ur e, do ub l e- c lic k Ben ew a k e_ LiD A R _V ie we r . e xe to op en the GU I pro gr a m .
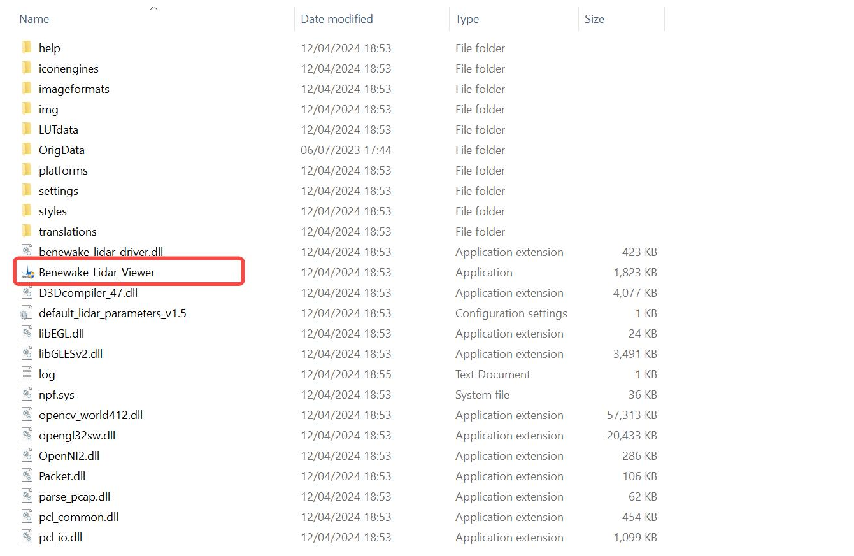
F igur e. 3: Sc r een sh o t of fil e st ru c t ur e
3 Int e rf a ce Int r o du c t i o n
The ma in in te r fa c e of BLV is sho wn in the fo ll o w ing figu r e:
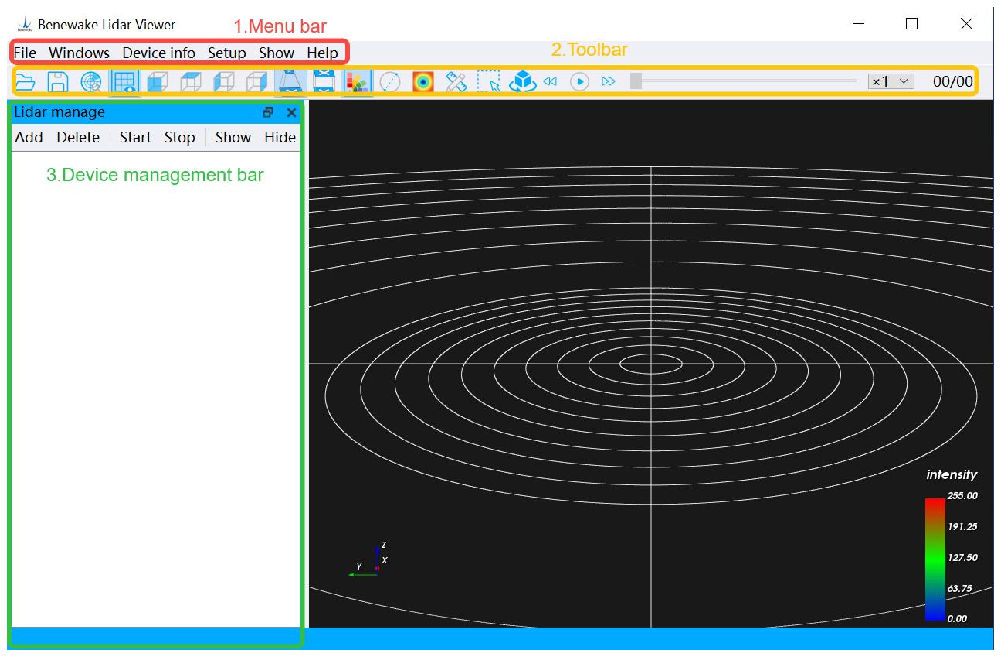
Figu re . 4 : Bene wa k e LiD A R Vi ewe r ma i n int er fa c e 1. Me nu Ba r: Ba sic co nf igu ra t io n op ti o ns 2. To o l b a r : Ba si c fun c ti o n op ti o ns , the sp ec i fic func ti o ns ar e as fo ll o ws :
| Ico n | Func t io n | I co n | Func t io n |
|---|---|---|---|
| Pla y b a c k *. PC D file |
Or th o Pro j ec t io n | ||
| Sa ve *. PC D fil e (f r o m Li D AR ). |
Di sp l a y the hue ind i c a to r ma p |
||
| Se a r c h fo r dev ic e s in the cu rr e nt net wo r k |
Set the po i nt siz e | ||
| Di sp la y the sc a le | Ra ng ing | ||
| Fr o nt vie w | Bo x sel ec t io n | ||
| To p vi ew | Ro a m in g ro t a t io n | ||
| Lef t vi ew | Pla y | ||
| Righ t vi ew | Tim e out | ||
| Per sp e c t iv e pro j ec t io n | |||
Ta b le. 2: To o l b a r ic o ns 3. De v ic e Ma n a ge me nt Ba r : Ma na ge de v ic e ad d it io n an d de let io n,
co nt r o l de v ic e sta rt and st o p , disp l a y dev ic e info r ma t io n an d co nne c t io n st a tu s, et c .
4. Po i nt cl o u d di sp l a y ar ea : Dis p la y s re a l- t im e po int cl o ud s or pla y s po int clo ud da t a fil es.
4 F un c t i o n s Int r o du c t i o n
4.1 Po i n t Cl o u d Di spl ay Adj u st m e n t
4. 1 .1 Poi n t cl ou d di sp l a y
1. Plea se co m p l et e the co nf igu ra t io n befo re use ac c o r d ing to Ch a p t er 1. 4 .
2. Op en the BL V so ft w a re , the r e ar e tw o wa y s to ad d LiD A R : [M et ho d 1] (1 ) Cli c k De v ic e Ma na ge me nt Ba r → Ad d but to n to set the IP, PO RT , DS O P of the LiD A R .
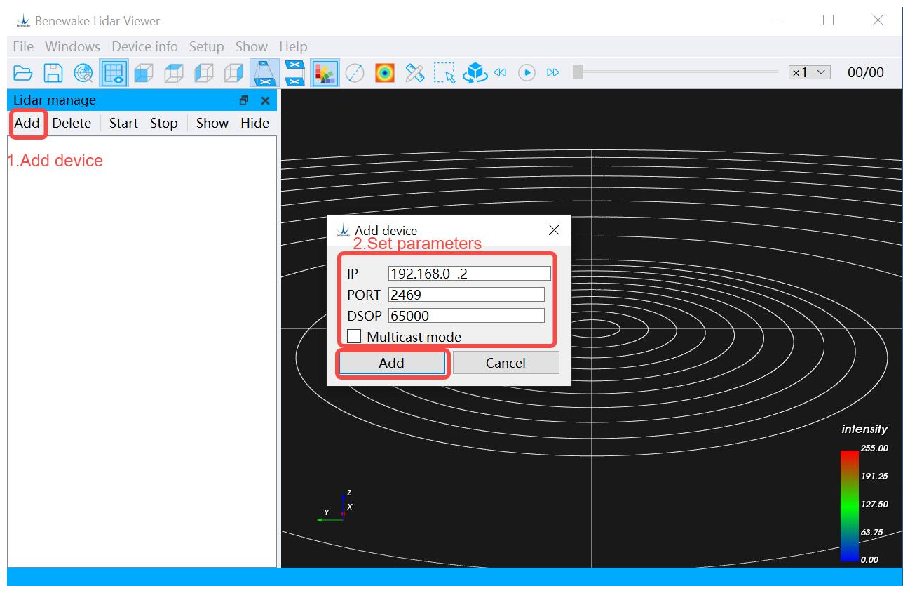
Figu re . 5 : Ad d de v ic e in fo r m a t io n In gene r a l, the fo ll o w ing ta b l e desc ri b es the pa r a m e te rs :
| Pa r a m et e r ite m s | Pa r a m e te r va l ue |
|---|---|
| IP | 1 92. 1 6 8 . 0 . 2 |
| PO RT | 246 9 |
| DS O P | 6 27 0 2 |
| Mul ti c a st mo d e | Un c he c ke d |
Ta b le . 3: Pa r a m e te rs fo r ad d ing LiD A R ( 3)Fin a lly , co n fir m the ad d it io n .
[M et ho d 2] ( 1 ) Cli c k the ic o n in the to o lb a r to sea r c h fo r the dev ic e (th e sea r c h po r t is 62 7 0 2) , as sho wn in the fig ur e, and clic k OK to co m p let e the ad d it io n .
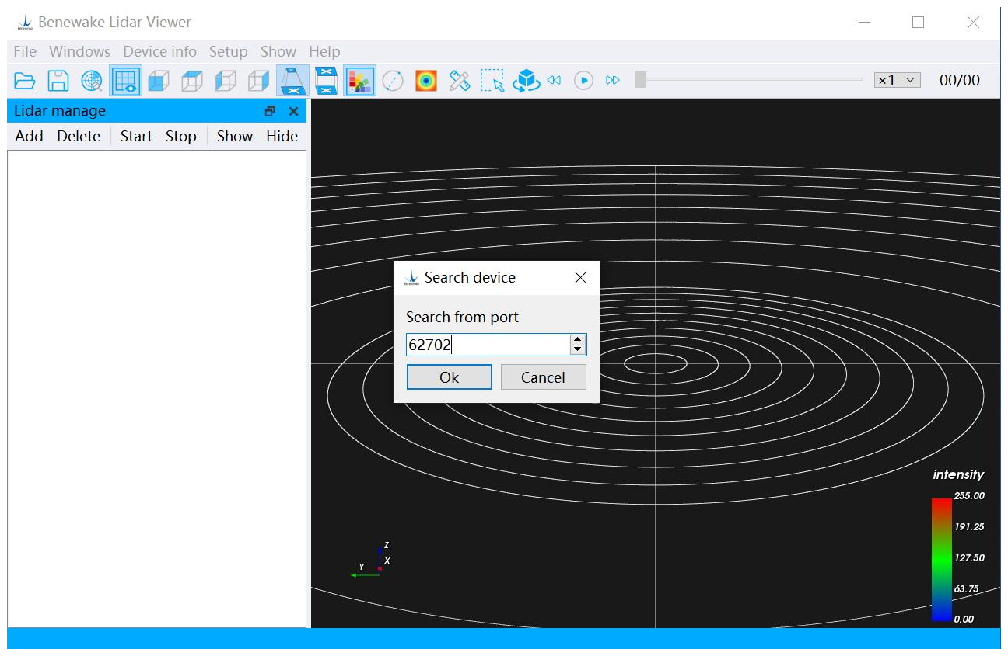
Fig ur e. 6: Sea r c hi ng fo r a de v ic e ( 2 ) Af te r the ad d it io n is co m p let ed , the dev ic e in fo r m a t io n will be disp l a y ed in the De v ic e Ma na g em e nt Ba r , as sho w n in the fo ll o w ing fig ur e: (D u e to dif f e r e nt dev ic es , the dev ic e in fo r m a t i o n is no t ex a c t l y the sa m e , and the de v ic e in fo r m a t io n in the fig ur e is fo r ref er e nc e on ly ) .
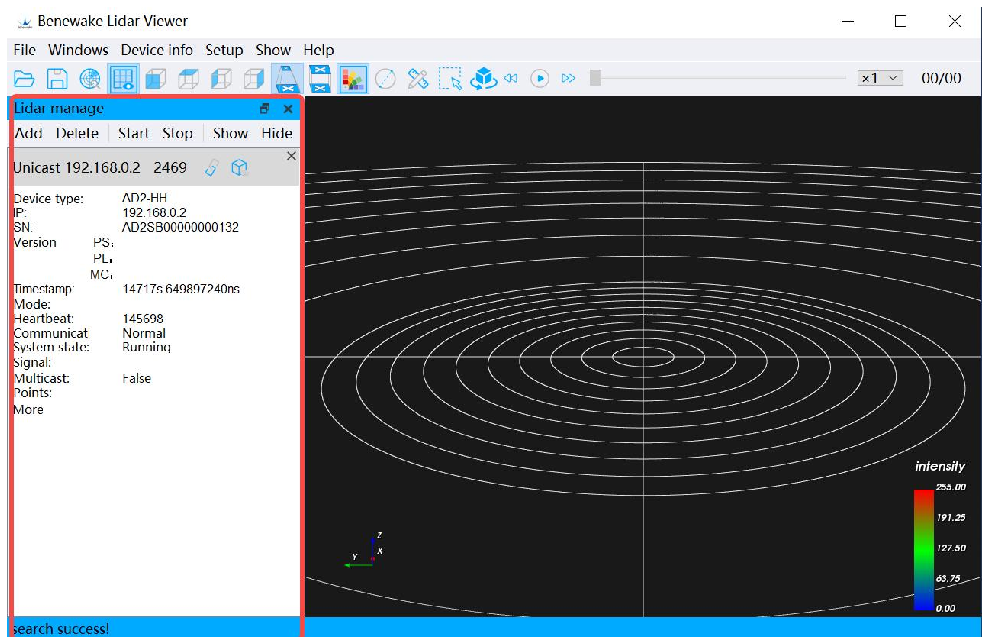
Figu re . 7: Ad d i ng the dev ic e Sta r ti ng LiD A R Af te r co mp l et in g the st ep s of ad d i ng the dev ic e , yo u ca n clic k the De v ic e Ma n a ge m en t Ba r → Sta r t but to n , wa it fo r a whil e, and the n sta r t to get the po int clo ud da t a , whi c h wil l be disp l a y ed in the Po i nt Cl o ud
Di sp la y Ar e a in re a l tim e . Cl ic k the Sto p bu tt o n to st o p the Li D AR fr o m wo r k ing .
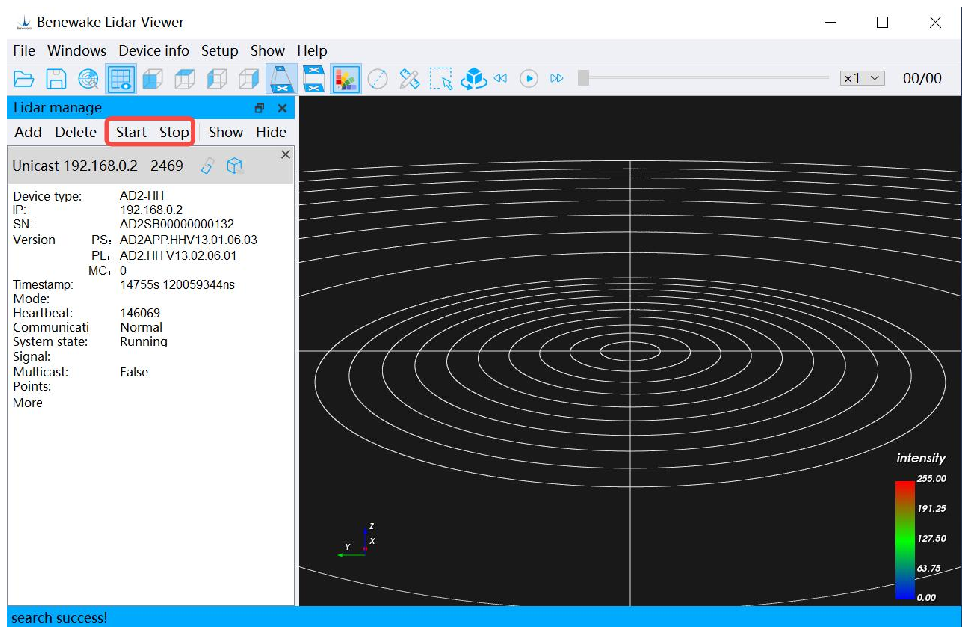
Figu r e. 8: De v ic e st a r t/s hu t do wn but to n s
4. 1 .2 Poi n t Cl ou d Dis p la y Ad ju s t men t s
1. Po in t clo ud disp l a y ad j u st m ent : as sho w n in the red bo x, the ar e a enc i rc led
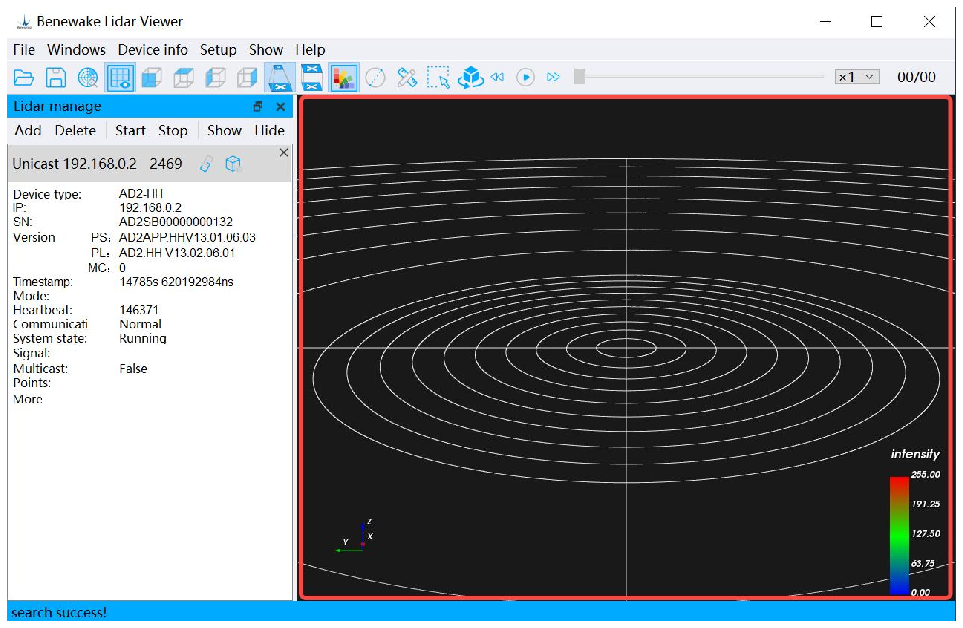
Figu re . 9 : Po in t clo ud disp l a y ar e a The fo llo wi ng ta b l e desc ri b es ho w to do thi s:
| Ad j u st m e nt re su lt s: | Ho w to do it : |
|---|---|
| Ch a nge the vi ew ing an gle of the | Ho l d do w n the lef t mo u se bu tt o n |
| po int clo ud di sp la y | and dra g in diff er en t dir ec t io n s |
|---|---|
| Zo o m in/o u t of the po i nt clo ud disp l a y |
Slid e the mo u se whee l |
| Mo v e the po int clo ud disp l a y as a who le |
Ho l d do wn the mo u se whe el (mi d d le but to n ) and dr a g in diff er en t di re c t io ns . |
Ta b le . 4 : Po int clo ud di sp la y ad j ust m en t met ho d No t e : Wh en yo u ca nno t co nt inu e to zo o m in on the po int cl o ud disp l a y usi ng the mo u se whe el, yo u ca n co nt inu e to zo o m in on the po int clo ud disp l a y by cl ic k ing the F key on the key b o a r d . At thi s po int , the po int clo ud disp l a y co nt inu es to zo o m in ce nt er ed on the mo u se -o v er po s it io n:
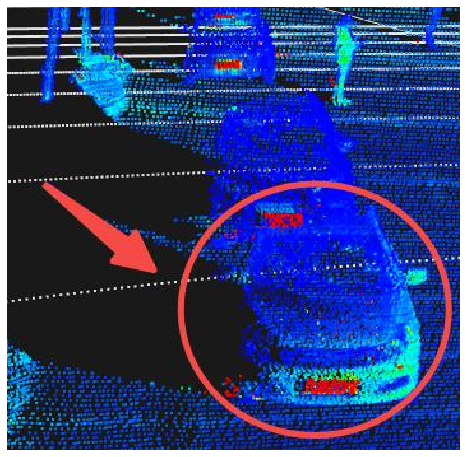
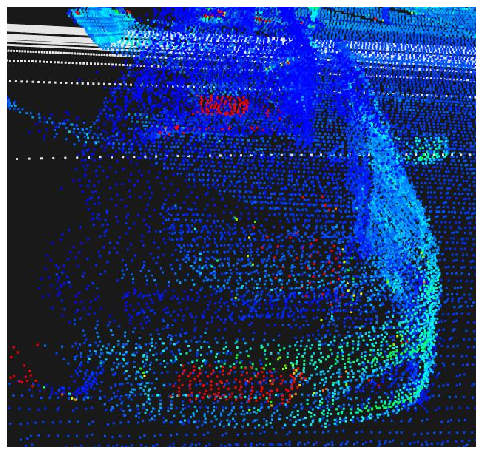
Fig ure . 10-a: Be for e zoom ing in with F key Fig ure . 10-b: Afte r zooming in with F ke y
2. An gle Ad j u st me nt : sel ec t the fo ll o w ing ic o ns in the To o l b a r to ad j us t the po i nt cl o ud da ta dis p la y vi ew , or in the Menu Ba r → Po in t Cl o ud Di sp l a y → Set Vie w.
| Ico n | Func t io n |
|---|---|
| Fr o nt vi ew | |
| To p vi ew | |
| Lef t vi ew | |
| Righ t vi ew |
Ta b le. 5: An gle of vie w ad j ust m en t 3. Po in t Siz e Ad j u st me nt : Cl ic k the ic o n in the To o l b a r to cha ng e the siz e of the po int , and a po p - up win d o w wil l ap p e a r as sho w n in the fo ll o w ing figu r e af t er clic k in g it (o r set it in the Men u Ba r → Po in t Clo ud Di sp l a y → Se t Po in t Siz e ) . The po int siz e ra ng e is 1~1 0 , an d the de fa u lt set t ing is 2.
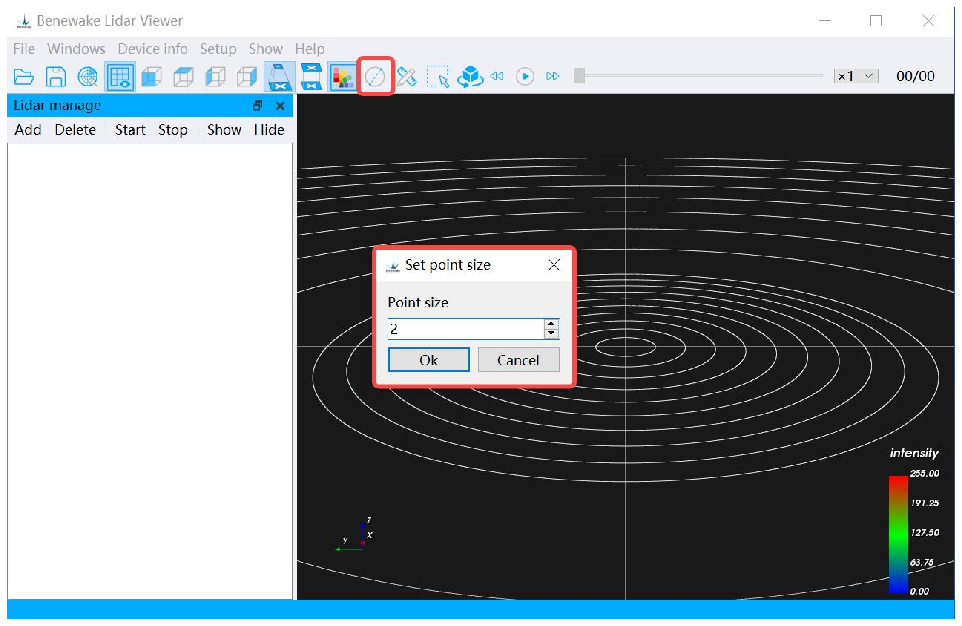
Fig ur e. 11 : Set ti ng the po i nt siz e 4. Set the co lo r sc he me : Se t the co l o r sc he m e in the Menu Ba r → Po in t Cl o ud Di sp l a y → Set co lo r sc he m e to re nd e r po i nt clo ud di sp l a y ac c o r d in g to re fle c t iv it y , dist a nc e, and ele v a ti o n (In gen er a l, the defa u lt re nd e ri ng co lo r is to ren d er at re fle c t iv it y ) .
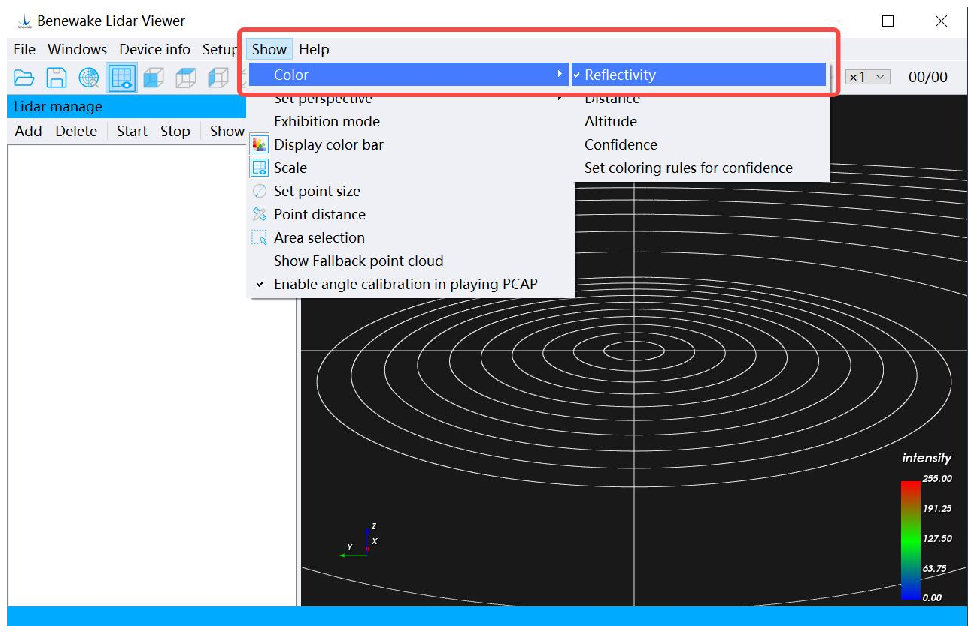
Figu r e. 12: Se tt in g co lo r sc hem e
4.2 Re co rd an d Pl ay b ack Po i n t Cl o u d Dat a
4. 2. 1 Re co rd i ng & Pla y b a ck *. PCD fi l e
1. Cl ic k the Men u Ba r → Fil e → Sa v e Fil e → Sa v e PC D Fil e (f ro m the dev ic e ) , sel ec t the sa v e pa th to st a r t re c o r d in g (o r clic k the To o lb a r ic o n) . If yo u nee d to end the rec o r d ing , clic k the Men u Ba r → Fil e → Sa v e Fil e → St o p Sa v in g PC D Fil e (F r o m De v ic e ) op ti o n to sto p the re c o r d in g (o r cl ic k the To o lb a r ic o n) .
( No t e : Yo u nee d to cho o s e the st o r a ge lo c a t io n , it is rec o mm e nd ed to cre a t e a new ded ic a te d fo ld e r to sa v e *PC D da ta ) .
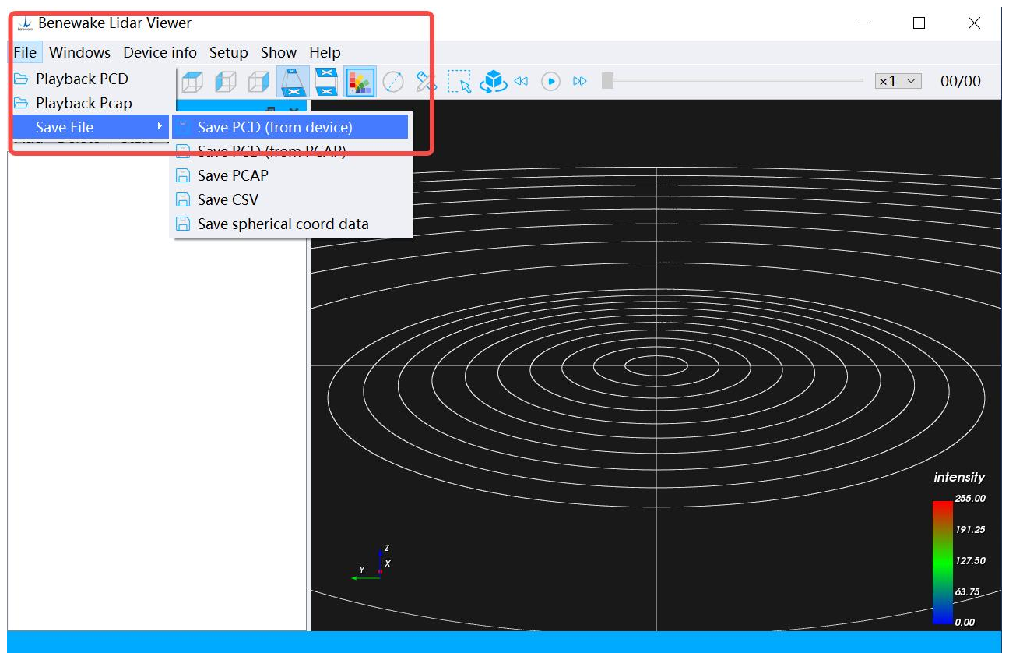
Fig ur e. 13: Re c o r d in g PC D file 2. Af te r yo u st a r t rec o rd ing , yo u ca n fin d the gene r a te d *. PC D fil es und e r the sa v ed pa t h of the set t ing s, whi c h ar e the co r re sp o nd in g po int clo ud da t a , ar e na m ed ac c o r d in g to the tim es ta m p .
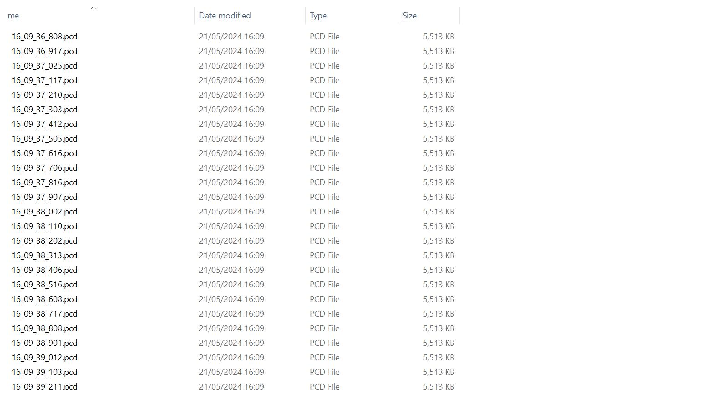
Fig ur e. 14 : *. PC D file s gen er a t ed dur ing re c o r d in g 3. Cl ic k the Men u Ba r → Fil e → Pl a y b a c k PC D Fil e op t io n (o r cl ic k the to o lb a r ic o n ) to find the sa v ed pa th yo u ha v e set aft er wa it in g fo r
a whi le, cl ic k the ic o n in the to o lb a r to pla y ba c k *. PC D file s.
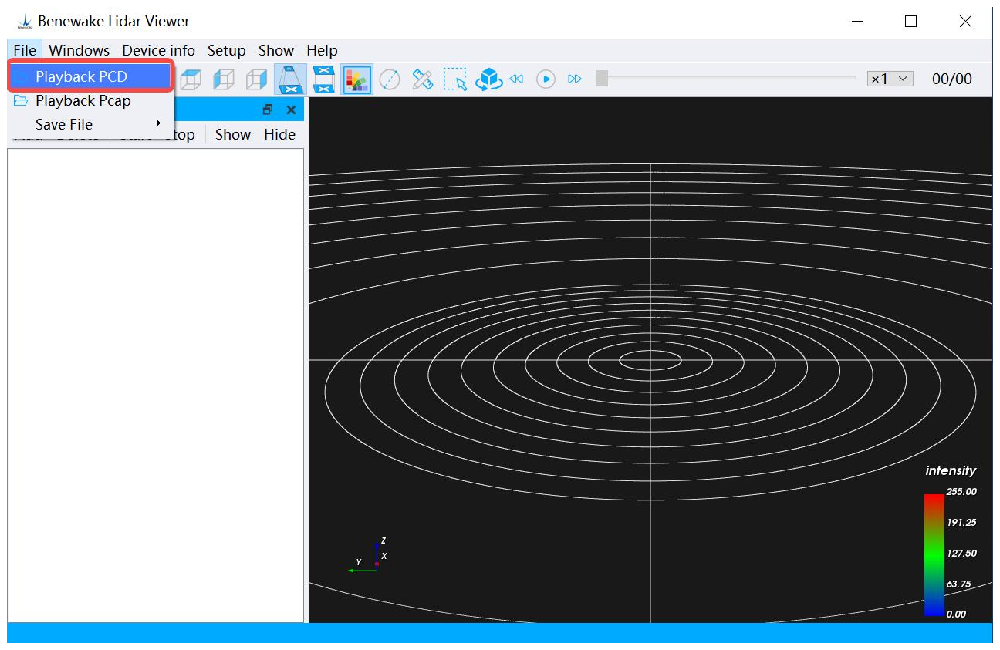
Figu r e. 15: Pla y b a c k *. PC D file 4. Onc e pla yb a c k st a rt s , the ic o n will ch a ng e to an ic o n, an d yo u ca n ta p to pa use the pla y b a c k da t a at any tim e. Yo u ca n dra g the pro gr es s ba r to vi ew the po int clo ud da ta yo u wa nt to fo c u s on.
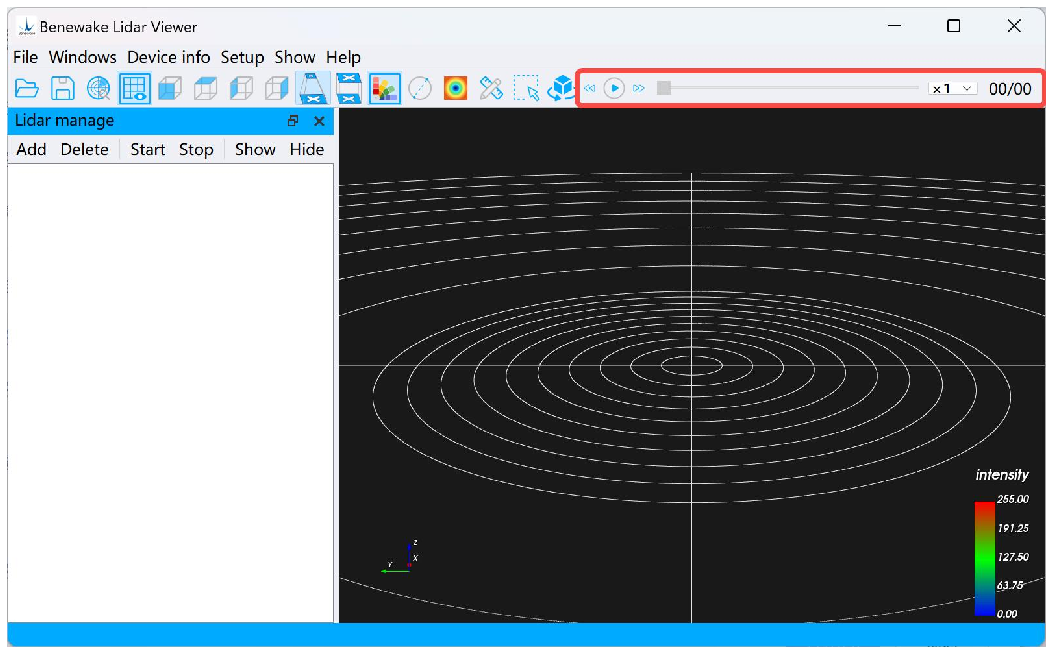
Fig ur e. 16 : Po int cl o ud pla yb a c k co nt r o l ba r
4. 2. 2 Re co rd i ng & Pla y b a ck *.P CAP fi l e
1. Cl ic k the Men u Ba r → Fil e → Sa v e Fil e → Sa v e PC A P File op ti o ns , sel ec t the sa v e pa t h, set the fi le na m e, and sta r t re c o r d in g. If yo u
nee d to end the re c o r d ing , clic k the Me nu Ba r → Fil e → Sa v e Fil e → Sto p Sa v in g PC A P Fil e op ti o ns to st o p the rec o r d ing . If the re c o r d ing is suc c e ss ful ly sto p p ed , a po p -u p win d o w wil l pr o m p t tha t the sa v ing is suc c e ss fu l.
( No t e : Yo u nee d to cho o s e the st o r a ge lo c a t io n , it is rec o mm e nd ed to cre a t e a new ded ic a te d fo ld e r to sa v e *PC A P da ta ) .
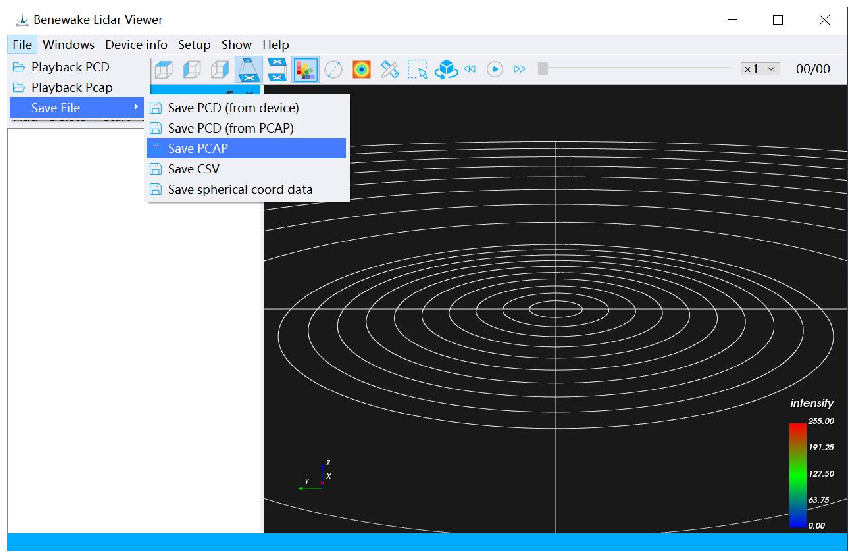
Fig ur e. 17 : Sa v e *. PC A P fil e 2. Cl ic k on the Me nu Ba r → Fil e → Pla y b a c k PC A P Fil e op t io n, an d sel ec t Sa v e the fin ish ed *. PC A P fil e, aft er a whil e, a po p - up win d o w wil l pro mp t tha t the fil e ha s be en suc c e ss fu lly im p o rt ed . Cl ic k the ic o n in the to o lb a r to pla y ba c k *. PC A P fil e.
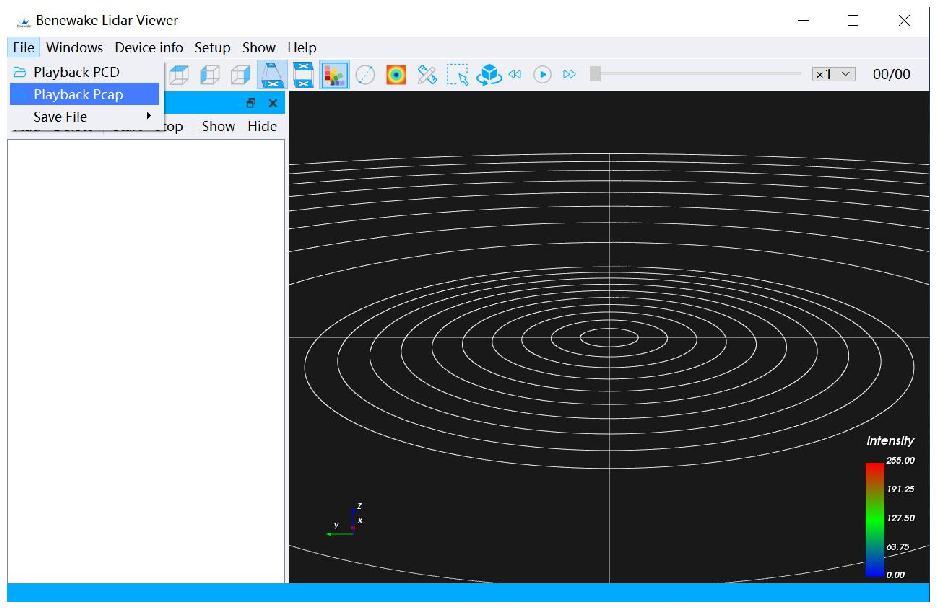
Fig ur e. 18 : Pla y b a c k *. PC A P file
3. Fo l lo w -u p an d pl a y b a c k *. PC D fil es.
4. 2. 3 Sa v e *. C S V fi l e
1. Cl ic k the Me nu Ba r → Fil e → Sa v e Fil e → Sa v e CS V Fil e op ti o n, an d sel ec t the sa v e pa th , yo u ca n sa v e a fra m e of da t a in the sa v e pa t h, and the re c o r d ed file will be na me d ac c o r d ing to the tim e st a m p . Us e Ex c el to op en a sa v ed *. C S V file .
( No t e : Yo u nee d to cho o s e the sto r a g e lo c a t io n by yo ur se lf, it is re c o m m end e d to cre a t e a new de d ic a t ed fo ld e r to sa v e *. CS V da ta ) .
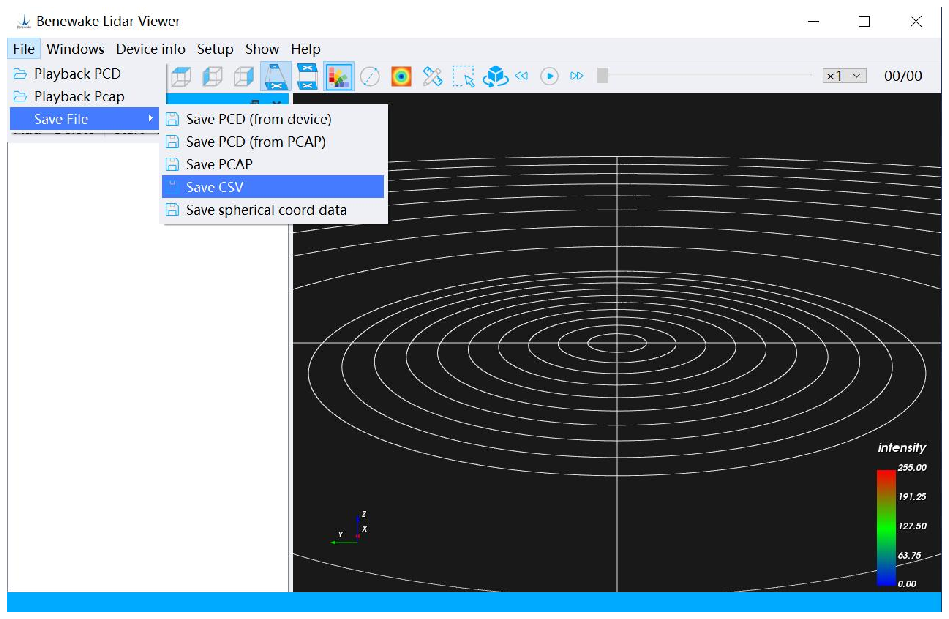
Fig ur e. 19 : Sa v e *. C S V fil e

Figu re . 20: Sa v e the fin ish ed one* . C S V fil e
4.3 Fu n ct i o n s Re l at e d to De v i ce
Man a ge m e n t Bar
As sho w n in the fi gur e belo w, clic k the co r re sp o nd in g bu tt o n in the De v ic e Ma n a ge m en t Ba r to use the co r re sp o nd in g fun c ti o ns .
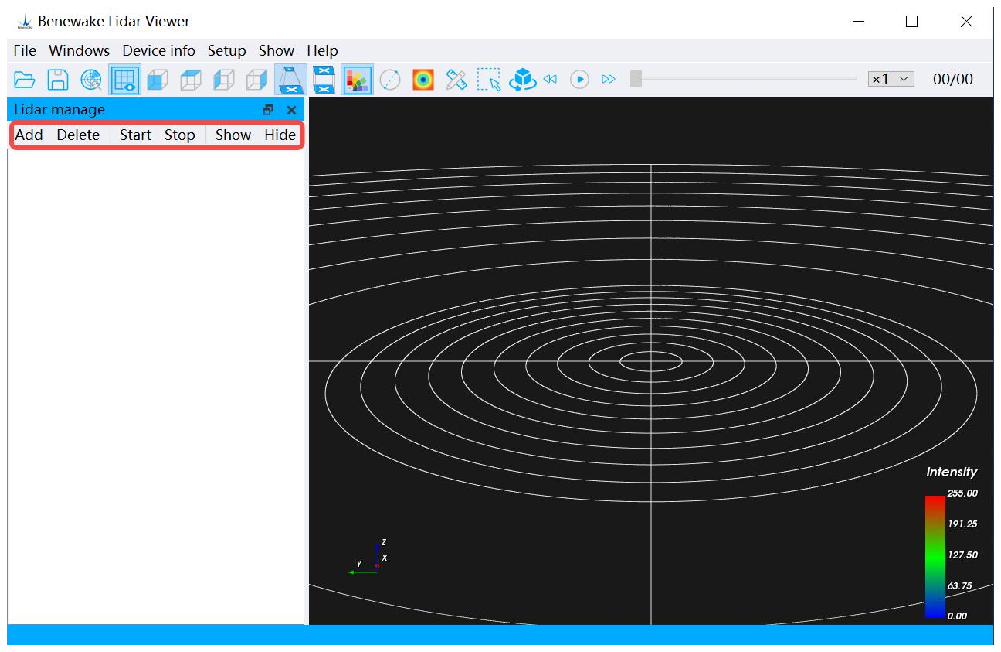
Fig ur e. 21 : Op t io na l fun c ti o ns in dev ic e ma na gem en t ba r 1. Ad d : Ad d a new LiD A R dev ic e 2. De le t e: De le te the ad d ed dev ic e 3. Sta r t: Run the de v ic e s tha t ha v e been ad d ed 4. Sto p : Sto p the run nin g dev ic e tha t yo u ad d ed 5. Di sp la y : Di sp l a y the po int clo ud da t a of the sele c t ed dev ic e in the po int clo ud dis p la y ar ea 6. Hi d e: Hid e the po int clo ud da ta of the sel ec t ed dev ic e
4.4 To o l b ar Re l at e d Fu n ct i o n s
4. 4 .1 Sc a l e Di sp l a y
Sele c t /inv e r t the ic o n in the to o l b a r to co nt r o l whet he r the sc a le is disp l a y ed , and the co nt r a st (c o mp a r i so n ) eff ec t is sho wn in the fo ll o w ing fig ur e:
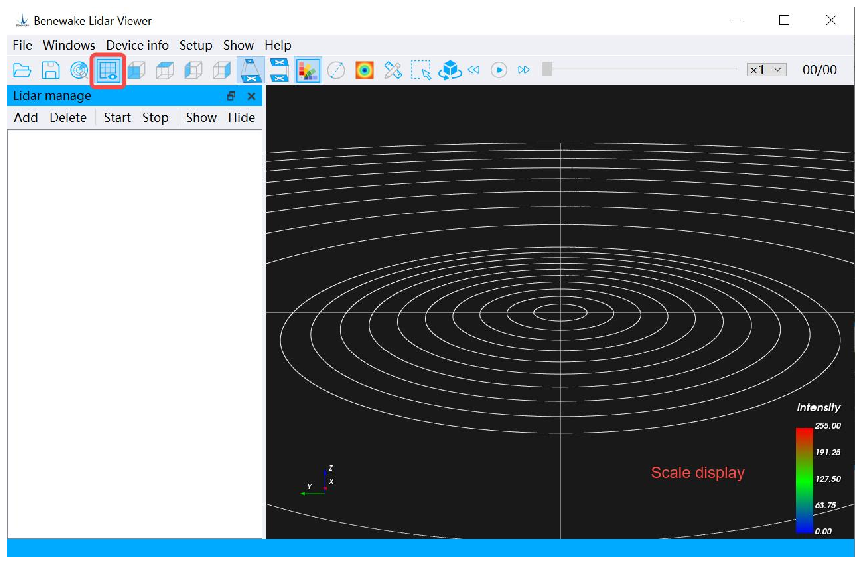
Fig ur e. 22 -a : Sc a le sho ws co nt r a st (c o mp a ri so n)
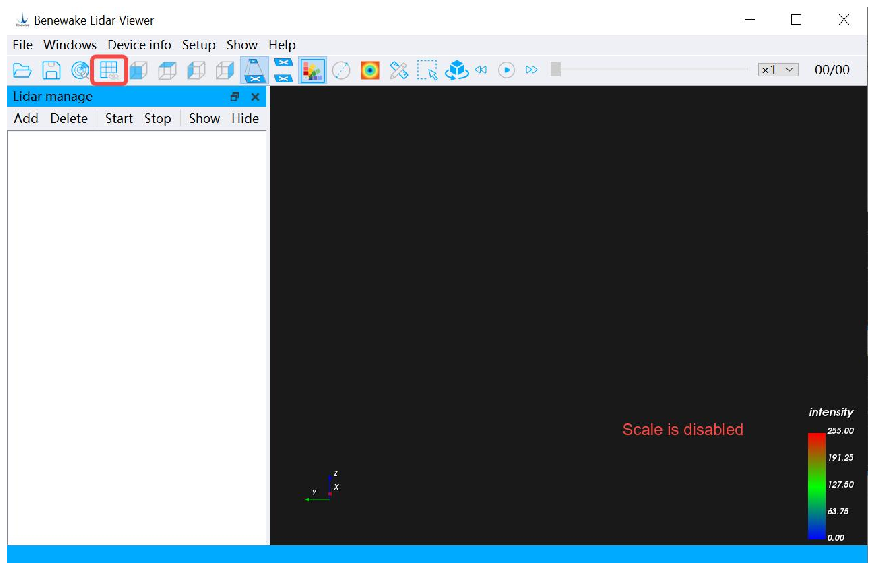
Fig ur e. 22 -b : Sc a l e is di sa b l ed
4. 4 .2 Hue Ind i c a t or
Sele c t /inv e r t the ic o n in the to o lb a r to co nt r o l whe th er the hue ind i c a to r ba r is di sp la ye d , and the co nt r a st eff ec t is sho w n in the fo ll o w ing fi gur e :
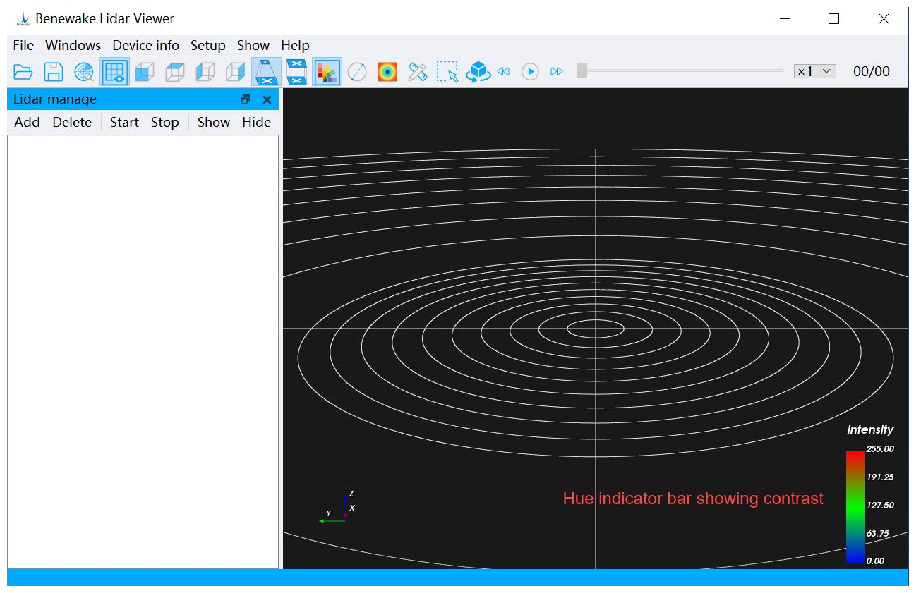
Fig ur e. 23- a : Hue ind i c a to r ba r sho win g co nt r a st (c o m p a r iso n)
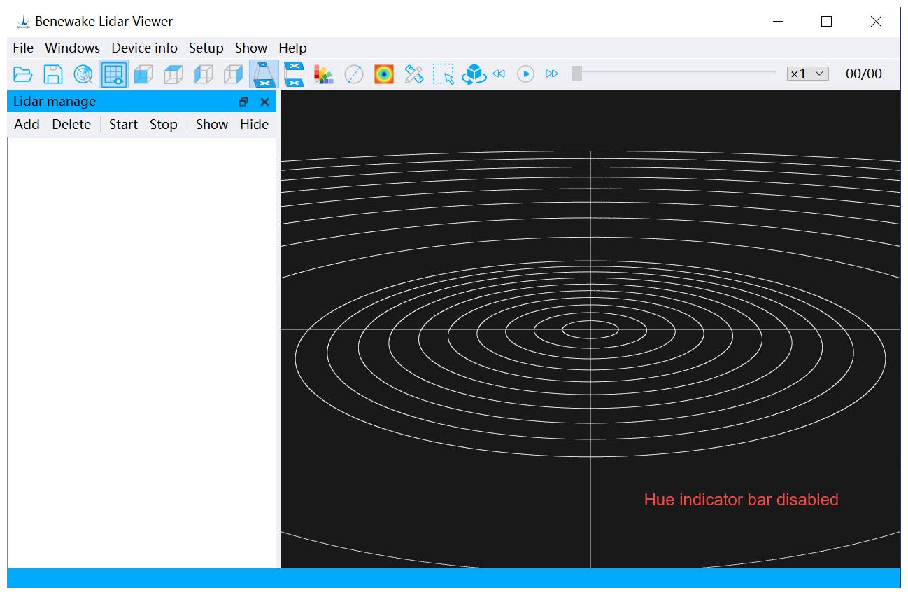
Fig ur e. 23 -b : Hue in d ic a t o r ba r di sa b l ed
4. 4 .3 Dist a n c e Mea su re men t
Cl ic k the ic o n in the to o lb a r to per fo r m ra n gin g op er a t io n s on the po int clo ud . St o p the de v ic e, clic k the ic o n, use the lef t mo u se but t o n to sel ec t the po int to be mea sur e d on the po int clo ud da ta in the po int clo ud di sp l a y are a , the sel ec t ed po int will be disp l a y ed in re d , af te r sel ec t in g tw o po int s, the dist a nc e be tw ee n the two po int s ca n be aut o m a ti c a lly ca l c ula te d , and the di st a nc e info rm a t io n wil l be disp l a y ed nea r the ra n gin g line , an d the di st a nc e me a su re m ent func t io n ca n be tur n ed off by clic k in g the ic o n aga in .
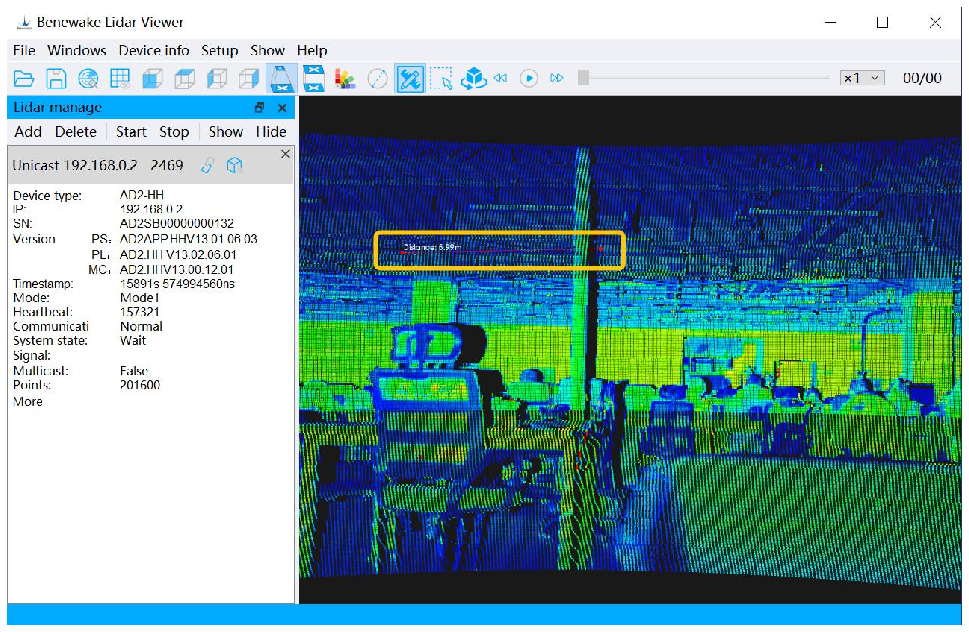
Fig ur e. 24 : Po int cl o ud ra ng ing
4. 4 .4 Poi n t Cl ou d Fra me Se le ct i o n
Cl ic k the ic o n in the to o l b a r to sel ec t the po int clo ud . Af te r clic k in g the ic o n , clic k the Lef t Mo u se But t o n onc e in the Po i nt Cl o u d Di sp l a y Ar e a , pre ss the X ke y on the ke yb o a r d , then pr e ss an d ho ld the Lef t Mo u se But t o n to sel ec t the po int clo ud ima ge (c a n be sel ec t ed mul ti p le tim e s) , an d re lea se the Lef t Mo us e But t o n to co m p let e the bo x sele c ti o n.
The sele c t ed po in t cl o ud da t a is sho wn in re d , and an in fo r m a t io n win d o w wil l ap p ea r on the ri ght sid e of the BLV int e rf a c e to disp l a y det a ile d inf o r ma t io n of the sel ec t ed po int clo ud . Th en pr es s the X key on yo ur key b o a rd and inv e rt the ic o n to tur n off the bo x sel ec t io n .
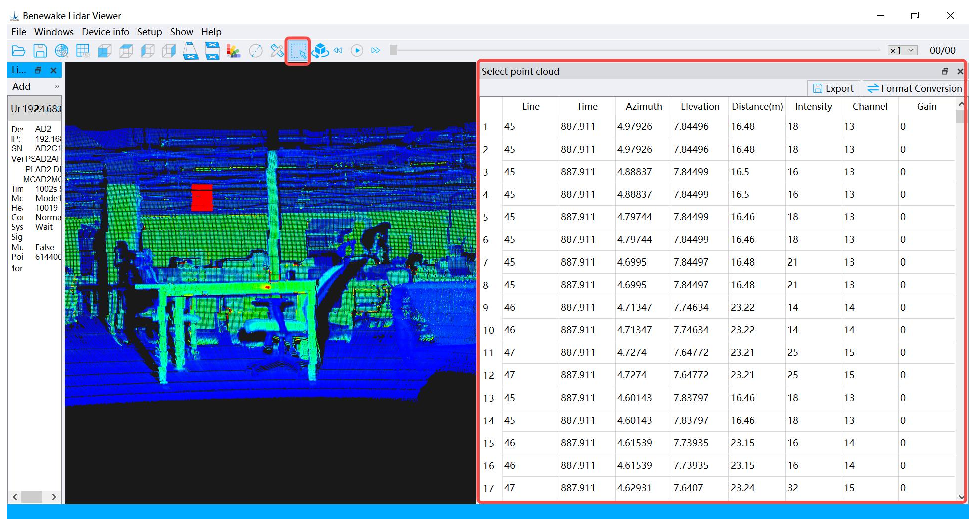
Fig ur e. 2 5: Po in t cl o ud bo x sele c t io n
4. 4 .5 Persp e ct i v e Proj ec t i on
De p en d ing on yo ur di sp l a y re q uir e me nt s, sel ec t the ic o n in the To o lb a r to cha ng e the di sp l a y of po int clo ud da ta . The po int clo ud disp l a y eff ec t of per sp e c t iv e pr o j e c t io n is cl o se r to the vi su a l eff ec t of hum a n ey e.
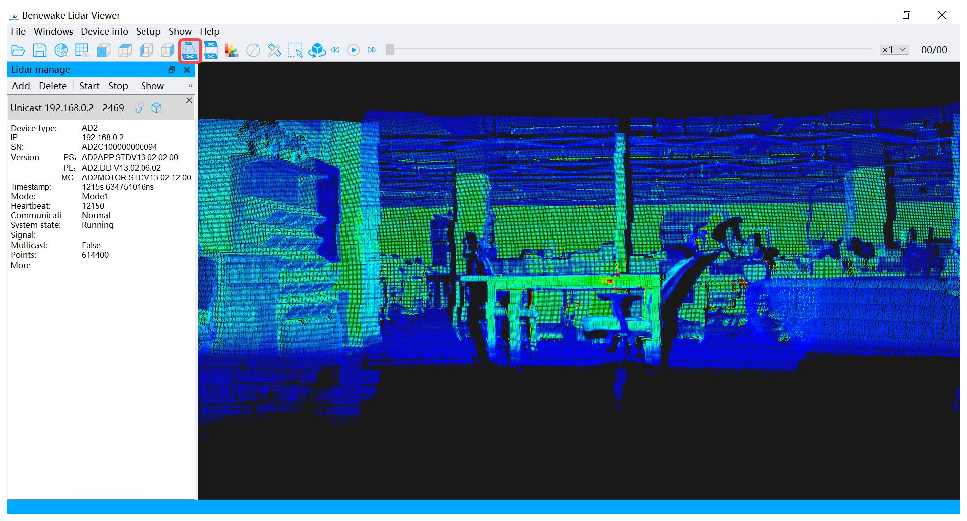
Figu re . 26 : Per sp ec t iv e pro j ec t io n disp l a y eff ec t
4. 4 .6 Ort h ogr a ph i c Proj ec t i on
Ac c o rd ing to yo ur re q uir e me nt s, clic k the ic o n in the To o lb a r to cha ng e the disp l a y eff ec t of the po int clo ud da ta to or t ho pro j ec t io n . In the ort ho pro j ec t io n eff ec t , ob j e c ts nea r and fa r ar e sc a le d at the sa me sc a le .
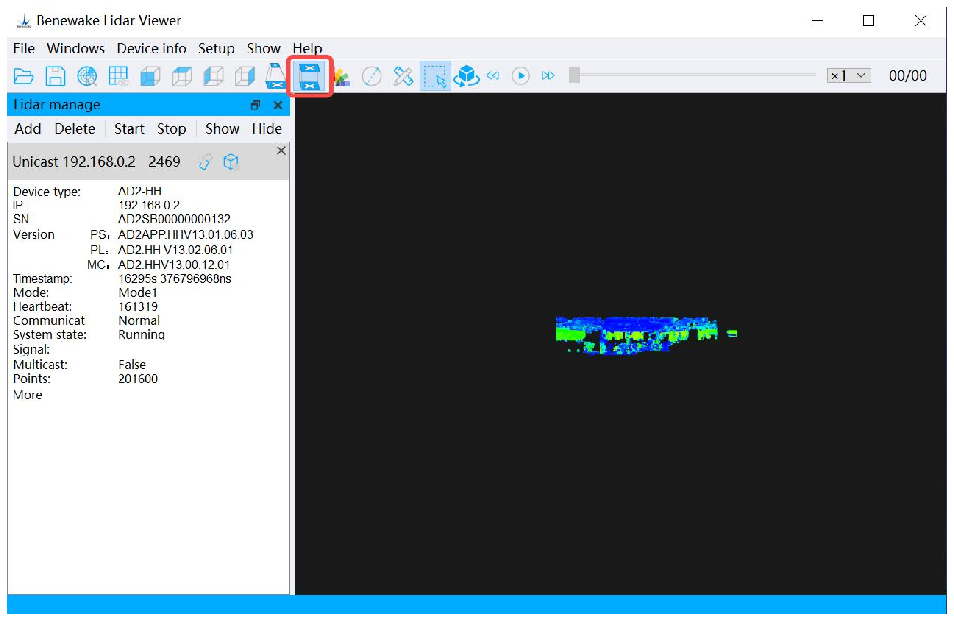
Fig ur e. 27 : Or th o gr a p h ic di sp la y eff ec t
4. 4 .7 Ro t a t i on Fu nc t i on
Cl ic k the ic o n in the to o lb a r to tur n on the ro t a t io n func t io n. Wh en ena b l ed , the po int clo ud di sp l a y will ro ta t e slo wly 36 0 ° ho r iz o n ta l ly alo ng the pla ne fo r m ed by the X-a xi s and Y- a x i s of the LiD A R wit h the Z- a x i s of LiD A R as the ro t a t io n axis .
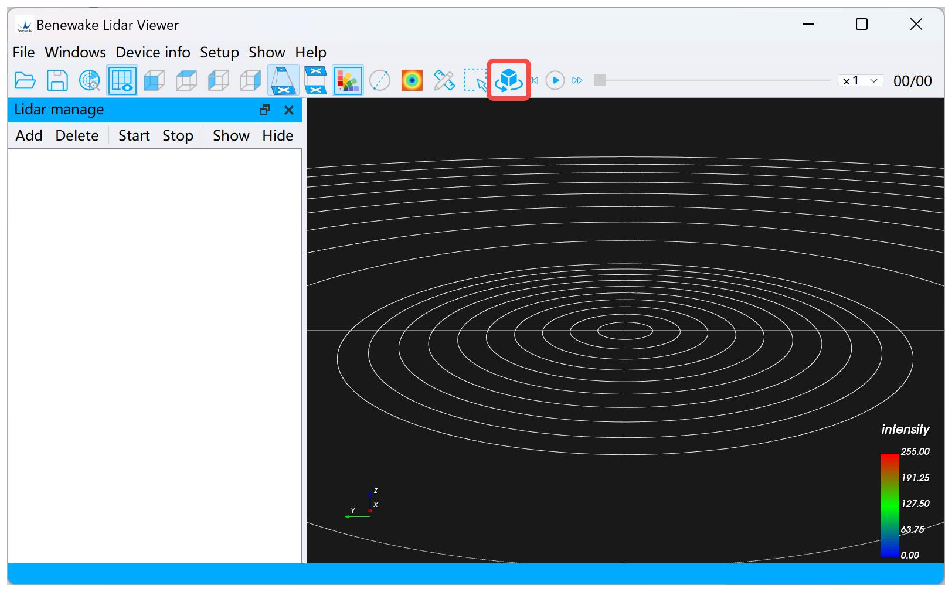
Fig ur e. 28 : Ro t a t io n fun c ti o n
4.5 Me n u Bar Re l at e d Fu n ct i o n s
4. 5. 1 Fil e
As sho wn in the figu re , fil e me nu ma in fun c ti o ns are : pl a y b a c k PC D file , pla y ba c k PC AP fil e, sa v e PC D fil e, sa v e CS V file , sa v e the PC AP fil e, etc .
Fo r mo r e info r ma t io n, pl ea s e see 4. 2 Ch a p t er .
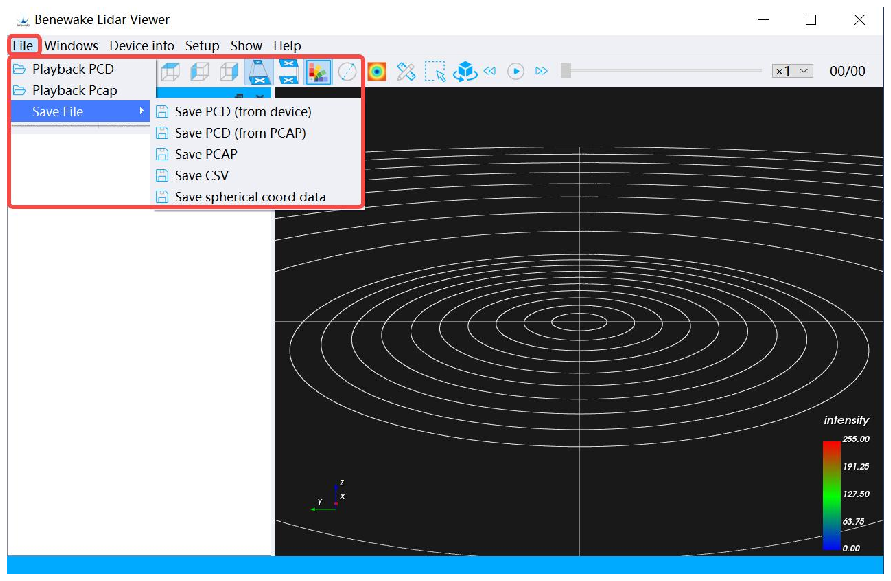
Figu re . 29 : File me nu
4. 5. 2 Win d o w
As sho wn in the figu re , cl ic k the Men u Ba r → Wi nd o w → Op en /C lo se De v ic e Wind o w op ti o ns to disp l a y and hid e the de v ic e ma n a gem e nt ba r .
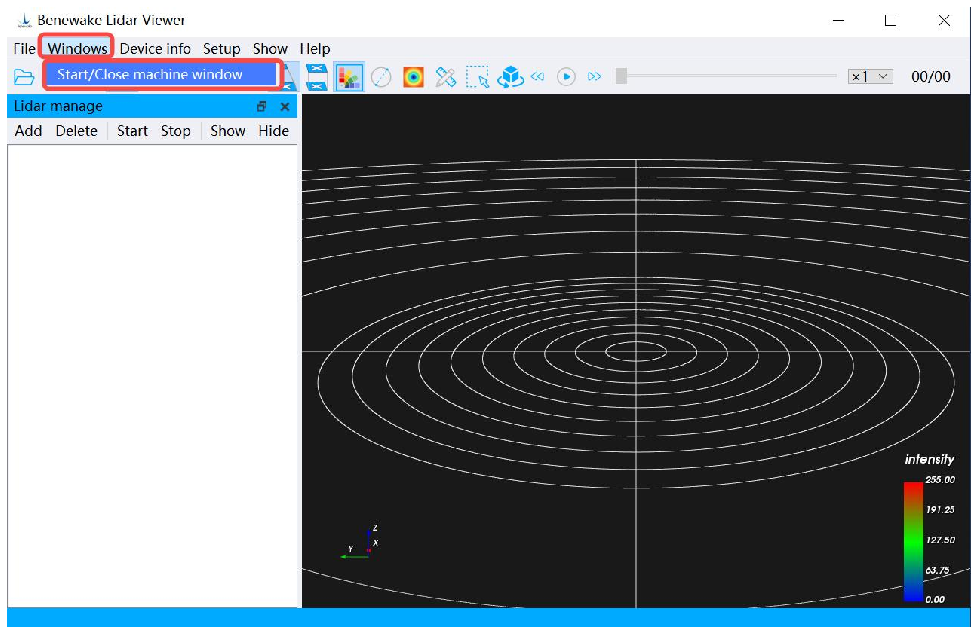
Figu r e. 30 -a : Dis p la y dev ic e ma n a gem e nt ba r
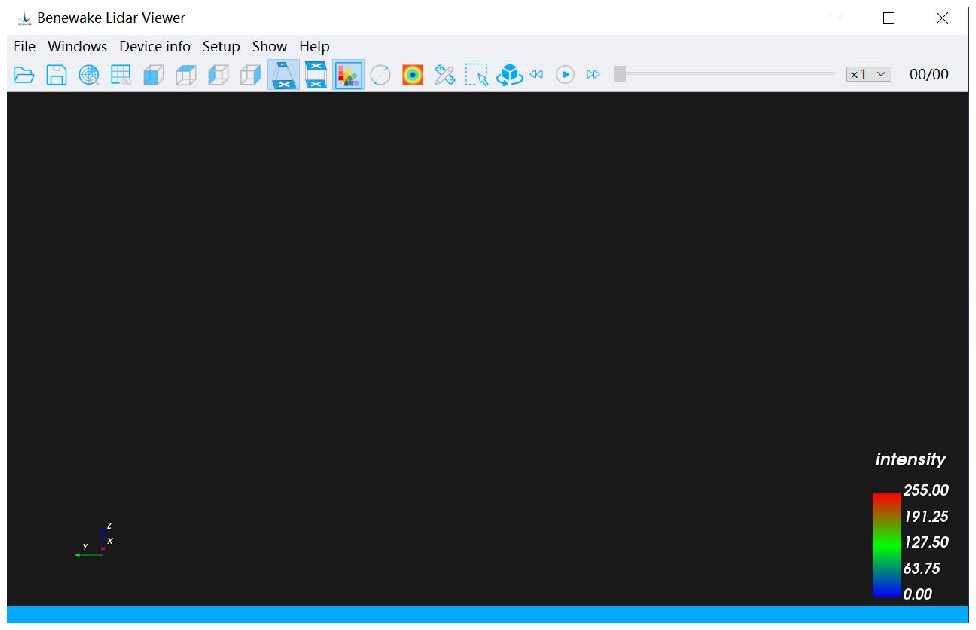
Fig ur e. 30 - b : Hid e de v ic e ma n a gem e nt ba r
4. 5. 3 Devi c e In f or ma t i on
As sho w n in the fig ur e, clic k the Me nu Ba r → De v ic e Inf o r m a t io n op ti o n , and sec o nd a r y op ti o ns suc h as Ge t De v ic e Inf o r m a t io n , Ge t De v ic e He a r tb ea t Inf o r m a t io n , Get De v ic e Lo gs , and Sea r c h fo r De v ic es in the
Cu r r en t Net w o r k wil l ap p e a r . By clic k in g the se op ti o ns , yo u ca n und e rs t a nd the ba sic info rm a t io n of the LiD A R dev ic e .
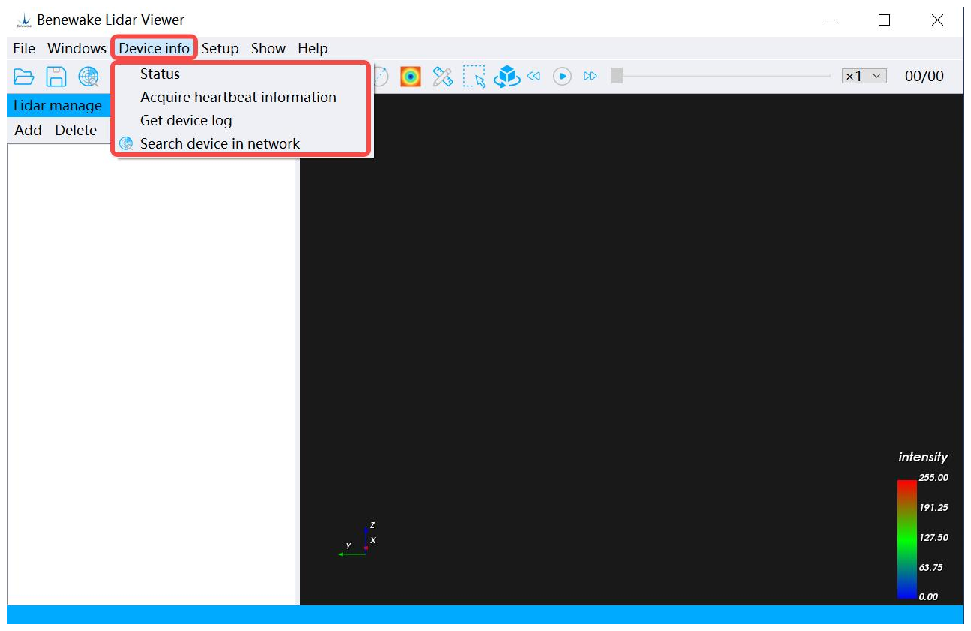
Fig ur e. 31 : De v ic e info r ma t io n 1. Ge t De v ic e Inf o r m a t io n : The SN num b er and fir m wa r e ve r sio n of the cur r ent dev ic e are disp l a y ed .
2. Ob t a in de v ic e hea rt b e a t inf o r m a t io n : The hea r t b ea t sig na l of the cur r ent dev ic e ca n be det ec t ed .
3. Ge t De v ic e Lo g s: di sp l a ys the lo g inf o r ma t io n of the cu rr e nt dev ic e .
4. Sea r c h fo r de v ic e s on th e cur r en t net wo r k: Sea r c h fo r ra d a r s wa it ing to co nne c t in the cur r e nt net wo rk seg me nt .
4. 5. 4 Co nf i gu ri n g De vi c e
Cl ic k the Me nu Ba r → Co nf ig ur e De v ic e op t io n to co n fig ur e so m e fun c ti o ns of the dev ic e ( No t e : If the LiD A R is in the ru nni ng st a te , the Co nf ig ur e De v ic e fun c ti o n is no t ava ila b l e) .
1. Cl ic k the Me nu Ba r → Co nfi gu r e De v ic e → LiD A R Op er a t io n Set t in gs → Set Mo d e op ti o ns to ma k e the LiD A R op er a t e in diff er en t wo r k ing mo d es. If yo u wa nt to kno w the pa ra me te r s of ea c h mo d e, pl ea s e co nt a c t Be ne wa k e te c hni c a l sup p o r t: su p p o r t @ b e n e w a k e . c o m
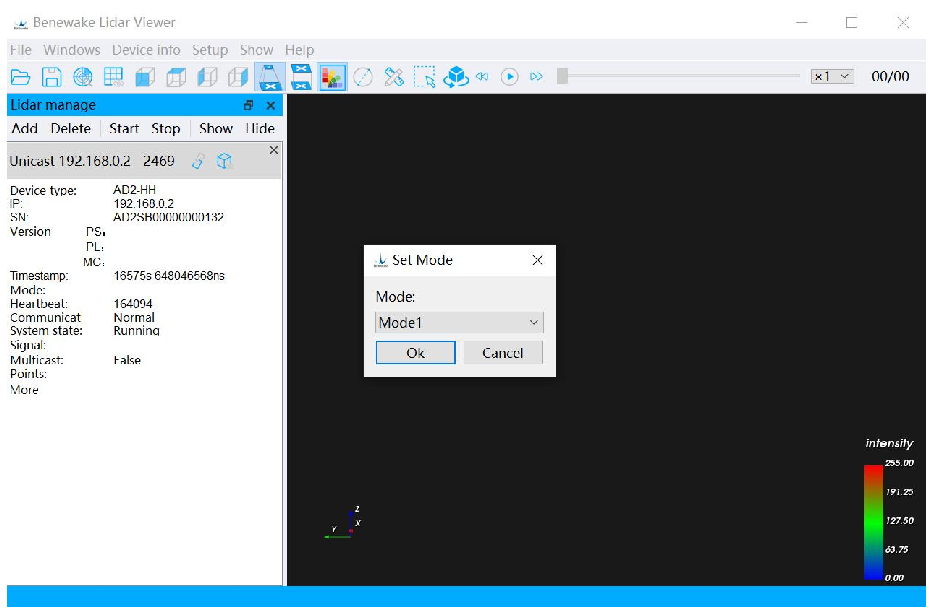
Figu re . 32: Set ti ng diff er en t mo d es 2.Fo r ot he r fun c ti o n co nfi gur a t io ns, pl ea s e co nt a c t Be new a k e tec h nic a l sup p o r t tea m : su p p o r t @ b e n e w a k e . c o m , and use the sen so r und e r pro fes si o na l guid a n c e.
4. 5. 5 Poi n t Cl ou d Dis p la y
Po in t clo ud di sp l a y , the ma i n fu nc t io n s ar e: set the co lo r sc he me , set the vi ew , exh ib it io n mo d e , disp l a y co l o r ba r , di sp l a y sc a le , ra n gin g bo x sel ec t io n 、 set po int siz e and so on. Fo r mo r e info rm a t io n, plea s e vis it 4. 1 & 4. 4 C ha p t er .
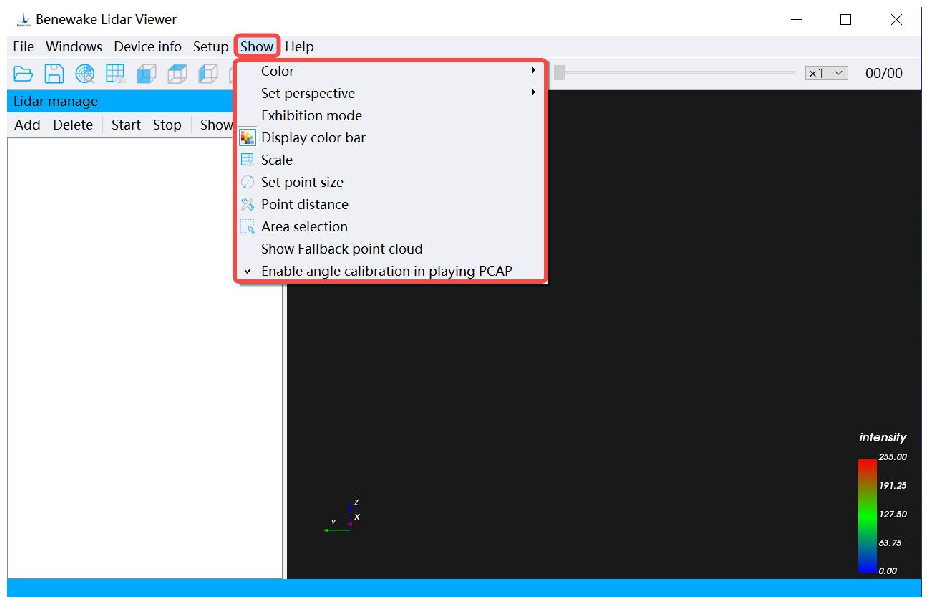
Fig ur e. 33: Po int clo ud dis p la y
4. 5. 6 Hel p Men u
In ad d i ti o n to the ab o v e fea t ur e s, BL V off er s a num b er of oth er fea t ur e s.
Cl ic k the Men u Ba r → He lp op ti o n to vie w.
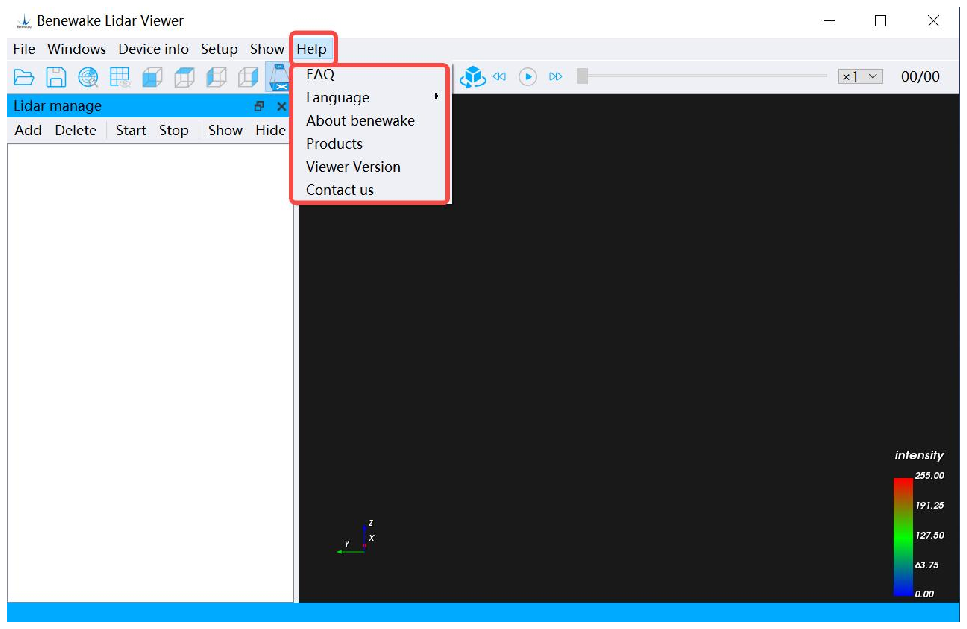
Fig ur e. 34 : Hel p me nu • Fr eq ue nt ly Ask e d Que st i o ns an d An sw er s : Fr eq u ent ly ask ed ques ti o ns and exp la na t io ns, inc lu d ing : the dev ic e do es no t st a r t, the po int clo ud is disp l a y ed inc o r r e c tl y or ca nno t be disp l a y ed , et c .
• Sel ec t La n gua ge: Se le c t the disp l a y la ng ua ge of BLV int er fa c e.
• Ab o ut Ben ew a k e: Co mp a ny Int r o d uc t io n.
• Pr o d u c t int r o d u c ti o n : Ben ewa k e pro d uc t po si ti o nin g, ap p lic a ti o n fie ld s , et c . , plea s e re fer to the pr o d uc t int ro d uc t io n pa ge of the off ic ia l web s it e fo r det a ils .
• Vi ew er Ve r si o n: GU I so ft w a re ve rs io n and re lea se da te .
• Co nt a c t us: If yo u enc o unt er an y pro b lem s du ri ng use , plea s e co nt a c t Be ne wa k e tec hni c a l sup p o r t.